
After 2 and a half years, I've filled 4 notebooks with notes and tips and troubleshooting steps, network configurations, processes....
I considered writing it up and started with an Index. When the Index was 12 pages long I thought maybe not.
So, here's a quick overview of the Workflow we use for Documentaries and Docu-Dramas.
First, a little bit about me and what we do. I'm the Edit Assistant. Prior to this I was a tape digitiser at the BBC. I thought learning a bit about IT would help me support the suites and make me a better assistant. I ended up being an IT Lecturer. After that short segue I ended up assisting offline edits in London.
The company I work for produces Documentaries containing reconstructions and real life accounts, as well as enhancing black and white archive materials. So far I have 93 TV credits here.
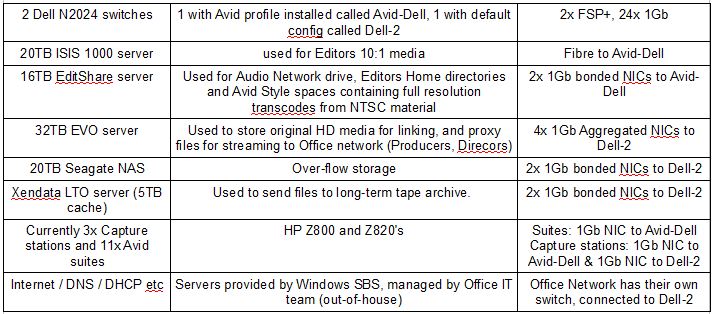
When I got here we had 4 suites, 2 capture stations and 3 media servers, working on 8 documentaries. In February this year I designed and implemented a network infrastructure, increasing our capacity to a maximum 22 systems, over 1Gb Ethernet. We're currently running 11 suites, 3 capture stations and 5 media servers.
Our current Tech Spec for deliveries is 1080i. It is Offline edited in-house using Offline resolution 10:1. This is conformed to DNX185x and sent out of house to a Post Production facility for the Online/Grade/Audio/Dub/creation of deliverables. I oversee the Offline part of this Workflow, and this is what I'll walk you through in this blog.
Please leave comments and questions if there's anything you would like to know more about.
Network

Pre to Production to Post
All of these stages should collaborate. Firstly, the show will have a Tech Spec - a contract stating what is to be delivered. If the Tech Spec specifies 4K, then you'll want to film with cameras capable of 4K, schedule time for the wrangling of the media captured, and make sure it's in a format your Post Production house can work with i.e. is it compatible with the NLE? Do they have the storage requirements?
If it's a 1080 project is it interlaced or progressive? Do you want to shoot 4K and crop in? Can your Post Production house handle that? Do they have the infrastructure or storage requirements? All of these and more should be asked before filming begins. Post Production should work closely with Data Wranglers and DITs to ensure notes are passed to the camera operators and DOP's to make sure Post Production receives what they need, and notes are passed the other way, so Post Production are prepared for what's coming. i.e. if audio and video are recorded separately and require syncing in Post, this requires time. It's best we know that in advance to make a person and a system available for the task. The Editor will also need a record i.e. a shot log, of what was filmed so the Editor can identify their rushes.
For this we use Google Docs. That way, our teams who travel all around the world, can all log their rushes on the go. It's just like when you use used to take a tape out of the camera, put it into a tape box, and label the box with what's in the box. It's the same with digital cards. If you don't have internet access on set, you can download the document. Copy and paste it when you get a connection. If you don't have a laptop or time to wrangle on set, take envelopes. When a card comes out a camera, put it in a card box, put the box in the envelope. Write on the envelope what's on the card. Type this up later.
When it comes to 4K, people talk about storage as cheap. It is. Except your server is going to have a maximum capacity. Our server holds 16 hard drives. At 2TB each that's 32TB - before RAID and formatting. If we need to expand, we can't add to that. However, we could swap the 2TB drives out for 4TB drives, expanding us to 64TB - before RAID and formatting.
If we're going from a 1080 project to a 4K project we're going to need more than double the storage. We'll need at least 4 times the storage, and actually 4K UHD and HDR are larger than 4 times the size. That'll mean a chassis expansion. Not so cheap.
We could hang external drives off the back, but then your limited to the number of ports, unless you again pay out on hardware. It's not always just as easy as buying more hard drives.
Then there's the playback/processing requirements. The more full your drives are, the slower they perform. You need to leave breathing space on your drives for this, especially if you're using compression encoding such as Long-GOP. Long-GOP files will take up less space, but require more processing.
Basically, talk to your Post Production facility about your requirements before filming so you can come to an agreement on your camera settings and wrangling methods before you start shooting.
Data Wrangling
Depending on the camera there are various pieces of software you should use for watching your footage back to spot check the video and audio on the card, and to perform the backup. i.e. Canon XF Utility for the C300 and XF305, Sony Catalyst Browse for Sony FS7
You need at least 2 copies of your card - spot checked and verified - before you can re-format and reuse the card.
We use 3 external hard drives :-- label the drives External 1, External 2, and MASTER BACKUP
DAY 1: Copy your card to the MASTER BACKUP drive :-- Spot check and verify the backup :-- Repeat for all cards :-- Copy all cards to External 1 :-- External 1 goes back to post house, while the wrangler holds on to the MASTER BACKUP. This is in case External 1 drive is lost or damaged in transit.
STEP 1

STEP 2

DAY 2: Repeat Day 1, using External 2. At the end of the day External 2 is couriered to Post Production house, External 1 is couriered back to wrangler. You continue to rotate External 1 and 2 for the rest of the shoot.
A lot of people believe RAID drives should be used when wrangling on location. These people aren't necessarily wrong, but if you're only performing one backup and that backup is automatically mirrored to a second drive, then any corruption on the first copy will be replicated on the mirror copy. It's also best to store your 2 backups in separate locations. We usually courier one back to the office, while the DIT keeps hold of the other. For our workflow, none RAID drives work best for us. Feel free to leave feedback if you agree/disagree/have any advice to offer on this workflow.
Drive Processing
In Post Production the media on External Drives 1 and 2 is wrangled to the EVO Server :-- Clips are extracted from their hierarchy and Camera metadata deleted :-- Clips renamed :-- Link to clips in Avid :-- Transcode to 10:1 for the Editor :-- Bin with Linked clips stored for conform later :-- Bin with 10:1 clips shared with Editors
Here's an example of media straight from the camera, wrangled into a folder using our naming protocol:-

And here's the same media after we've processed it:-

We've used the naming protocol across every video clips, we've ditched the folder hierarchy and binned the .XML and .BIM files. These are Metadata files only understood by the camera and the vendors software i.e. Sony catalyst Browse. We don't need it for Avid. There are then 2 methods of AMA linking to this media; Link to the folder, or Link to the files. If you use the Folder option the AMA Plug-in will now fail as the clips will no longer be recognised as Sony media. However, if you use the Sony .MXF option, you can still AMA Link to these files.
We the create an Avid bin following the same naming protocol. In the example shown, the folder (card or roll) name is ABO_T1_44_F5, so an Avid bin called ABO_T1_44_F5_AMA is made. We Link to the media :-- Transcode to 10:1 to the Editors drive on the ISIS :-- Create a bin called ABO_T1_44_F5 :-- Move the 10:1 proxies into this new bin :-- Share the bin with the Editor :-- E-mail the Editor to let him know there's a new bin
To share the bin, we use a batch script, which copies new files using ROBOCOPY into each Editors project. Each episode/documentary has a project. Within that project, we made the following folders:--

We save out bins in an INGEST project; \CAPTURE1\ folder :-- Share the bins in the EPISODE project \CAPTURE1\folder. This is the script we use:-

The AMA bin is stored in another project called ONLINE, which follows the same folder hierarchy but only has the Linked version of all the media. This is a 1080i/50 project. All other projects are 25i PAL.
A lot of people argue you should never extract or rename clips - but we use the Canon C300, XF305 and Sony FS7 and have never had any issues. Should we have issues in the future, we have the MASTER BACKUP and External Hard Drives with the original material. If you work in an environment who categorically believe it is best never to extract media from their folder hierarchy or to rename clips, I would be interested to find out why you work that way. We find it much easy to keep track of files which follow a specific naming protocol.
We also use the Sony F700 and GoPro. For these we use AWPro to re-wrap the files as .mov so we can add timecode, making them more compatible with our workflow, as each file will be transcoded and then linked back to the original HD files later on. We also use the Canon 5D and 7D. For the 7D we add timecode using QTChanger. For the 5D, most camera ops now use Magic Lantern to force it to record Timecode. However, we check before import. If it doesn't have timecode, we add timecode.
Once the project has finished – and we haven't had any issues with the extracted renamed media – we archive the extracted renamed version, and re-format the backup drives for the next set of teams of DITs and Data Wranglers to use next series.
Proxies
The Directors, Producers and other production staff will want to watch their rushes back. If these rushes are recorded in high definition, with large bit rates, colour depths and pixel resolutions – especially 2K+ - they'll find it difficult to play these back. Especially over a network connection, extra especially is that connection is a Wi-Fi one.
The solution to this issue is proxy video files.
These are a low resolution video file in an easy to stream format, with a low bit rate, and in our case with a company watermark and Burnt-In Timecode (BITC)
The BITC is especially important for scripts and transcriptions.
The added benefit of producing proxies is that once the project is complete and the series is archived to LTO and the HD rushes are wiped from the server, you'll be able to keep these small proxies live on the network. Producers and Directors can then watch these back, make selections and place orders for the HD files to be pulled from LTO and restored to the server. This can save on shoot costs, especially if you already have GVs of a foreign country somewhere on an LTO.
For this we use Cat-DV. It's a Mac only product, but there are other Media Asset Management softwares available. Cat-DV uses a handy Watch Folder feature to automate proxy production. As soon as rushes are processed, we put them in a folder called EXTRACTED. This EXTRACTED folder is Watched by Cat-DV. When new material appears here, Cat-DV produces a proxy video; It converts the HD video to H264 1.8Mbps, 480x270 4:2:0 quicktimes with PCM 2 channel audio, retaining the source timecoded and burning it into the image, along with a company watermark.

In this example image, you can see the MediaInfo for an original HD 1080p file and the low res proxy, saving roughly 99.5% of the space. This is much easier to stream, upload, send to transcribers, take home, watch back. Everything.
When we start producing 4K material, we'll probably move to H265 proxies.
The only effort on my part is to set the Watch folder, and an output destination at the start of the series.
These proxy files can then be logged and 'published' through Cat-DV Pro and you can develop your own interface for searching and sifting through the proxy rushes. This means the Directors can search for 'Washington DC GV” and it will bring up all shots filmed by any team, on any series we have ever filmed. They can then use Cat-DV to log this files, and pass that log to the assistants, who can then recall the files from LTO storage to the server and get them into the Editors project.
Alternatively, in theory, we could edit from the proxy files, as the file names / durations / timecodes all match the master files. In the conform we could then pull the master HD files out of LTO storage, link to the media, and re-link the sequence to the HD files. However, we have not yet put this into practice. For us personally, it would delay the conform too much as we need the media readily available on the server to make the conform process as efficient as possible. Conforms are often overlooked in scheduling, and the first thing to get cut if people miss deadlines.
You can also use Sorenson Squeeze to configure watch folders, which is useful, but Squeeze doesn't retain the Timecode, which is almost entirely useless to us.
Archive Screeners
You can download these for free from websites like Pond-5 and Getty to use as placeholders :-- Cut them into your Edit :-- Order the master clips once you've made your final selections :-- Replace the screeners :-- Only pay for what you use.
We straight import these at 10:1, letting Avid deal with any standards conversions :-- Duplicate Name column to Tape ID column :-- Duplicate Timecode column to AUX1 column. This backups your metadata, in case anyone attempts to modify this information.


In these examples, you can see how the companies protect their clips using watermarks or burnt in clip numbers, and occasionally Timecode
Archive Masters
The final full resolution clips, bought and paid for.
If they're not already Quicktimes or MXF's convert them :-- Add Timecode if necessary (we use QTChanger) :-- Link to Media :-- Duplicate Name column to Tape ID column :-- Duplicate Timecode column to AUX1 column :--....
If it's NTSC media transcode at Full Res to a drive not seen by the Editors (in our case on EditShare). This will let Avid handle the standards conversion to PAL (i.e. 24fps or 29.97fps to 25fps). It's not perfect, but more time can be taken at the conform or Online stage. Right now we just want to get it to the Editor ASAP. :-- Transcode again to 10:1 to a drive the Editor can see (in our case on the ISIS) :-- Share bin
If it's PAL media transcode to 10:1 :-- Share bin
To conform from screeners to masters, first make sure you have a Picture Reference (Video Mixdown) so you can check you did it right after you've done it. Cut the clips into the sequence by eye-matching the clips, or change the Avid Tape ID column to match that of the screeners, and the Timecode column :-- Right click sequence :-- Relink
Still Processing
We rename all our stills to include ST_ at the start, to indicate it's a Still that will need batch importing at full resolution during the conform, and a source ID is included in the file name, so we know it the clips came from Getty or ShutterStock etc.
The stills need to be kept below 5000x5000, otherwise Avid will get confused. We use Gimp for image re-sizing, as it's very similar to Photoshop but it's free.
The Stills are then given to the Editor to choose whether to import them or link to them using Avid Pan & Scan
Conforms
Because our Editors edit at 10:1 resolution their final film - their Avid sequence - needs to be conformed back to high resolution before we send it on to the Online for grading.
Create a Video Mixdown first :-- Open all bins containing the linked clips, linking to the high resolution footage :-- Highlight all clips :-- Right click sequence :-- Relink to Highlighted clips via Tape ID :-- Because we duplicated the Name column to Tape ID at the start of the Workflow, it won't matter if the Editors have renamed the clips. We'll still have the original name backup to the Tape ID column :-- Archive will need some toying with if you're replacing Screeners with Master archive. :-- Graphics and Stills need to be batch imported to your tech spec i.e. 1080i :-- Picture check / Compare back to Video Mixdown to check it all worked
Once everything in the sequence is HD :-- Transcode to DNX185x (or codec needed for delivery) with handles :-- Deliver DNX185x media to Online/grade :-- Provide Online with original files of archive in case our Standards conversions were bad. Then they can fix it from the original.
Create Audio AAF from original Offline sequence :-- Deliver this, along with a split track BITC QT to Audio/Dub
General Viewing Exports
Duplicate sequence :-- Check all items are online :-- QT Movie :-- 640x360 :-- H264 :-- Auto key frame / Don't reorder / Don't multi-pass / Qual: Medium / Auto Data rate :-- Audio: compress MPEG 4 low


EDLs
Output :-- List tool :-- File_129 :-- List Options: Clip Names

Backing up / Archiving
Servers do not have an endless amount of storage, so you can't keep piling on project after project. Files need to be archived some where else once you're done with them, so you can recall them should you need them. For this we need something cheap and extendible.
Solution: LTO tapes.
These are digital tapes. Not VHS or Beta tapes. We currently use LTO 5, which stores 1.5TB of data across 2,776 feet of digital tape. We use roughly 6 tapes per series, per copy. We make 3 copies of each series... using almost 9.5 miles of tape per series! One of these copies is to be stored out of house in a storage facility in case the building burns down.
For this we use Xendata. It's as easy as copy and paste.
It has a 5.5TB RAID'd cache you can use to store files while they write to tape. Be careful not to fill the cache, otherwise you can't continue to use the server to backup until the files are written to tape and the cache cleared.

To write to tape create a Volume Set Configuration (This groups your tapes, which you can continue to add to as your project grows) :-- Add your first tape :-- Create a File Group configuration (this tells Xendata what to do with the files you're writing to the cache) :-- Point the FGC to the VSC :-- Copy the files you want to backup to the Xendata cache.
Converting / Transcoding
We use Sorenson Squeeze, Handbrake, MPEG Streamclip, AWPro, FFMPEG or Avid Media Composer
And QTChanger for adding Timecode Metadata
For Screeners we want to get them converted as quickly as possible, so H264 is our go-to codec in most situations.
Master Archive needs to be taken care of more delicately. For this we use MediaInfo to find out as much as we can about the clips itself i.e. Frame rate, current codec, bit rate, and then pick the right tool for the job, usually converting to DNX Quicktimes
FFMPEG is great for representative tasks i.e. if you have a hundred clips you need to strip the audio from. Write yourself a script in a batch file and away you go!

Other Day To Day Assistant Duties
Check the servers for Error messages
Monitor storage
Troubleshoot errors on servers and in suites
Setting up suites
Research workflow improvements
Develop network topologies to make infrastructure/security improvements
Edit Suite prep
Project, Workspace, User creation
Migrate Data from old LTO tapes to new LTO tapes (explained below)
Rip/write DVDs
Digitise tapes (Beta SP, Digi-Beta, mini-DV)
Wrangling laptop prep
DIT Training to freelance staff
Train Archive Producers in our processes
Asset logging
IT/Hardware maintenance
Updating our Audio Network drive
Transfers (Vimeo, myairbridge, WeTransfer, FTP)
Tape digitising
Timelapse stitching
System updates and software upgrades
Research and development
Remote Support (Teamviewer, Remote Desktop/Assistance, VNC)
Manage cloud documentation
LTO Migration
LTO software will read/write to a certain generation of LTO tape and one prior to that, and read to one prior again. i.e. Our LTO server uses LTO 5. This means it can read/write to LTO 5 and LTO 4. It can also read LTO 3, but can't write to it. Anything that wasn't migrated to LTO 3 or higher can no longer be read. All LTO 3 data should now be migrated to LTO 5, before we loose the ability to Read LTO 3.
im very impressed with your post because this post is very beneficial for me and provide a new knowledge to me
ReplyDeleteAvid Media Composer Crack
Doothcrow: Post Production Workflow / Offline Editing / Avid Media Composer >>>>> Download Now
ReplyDelete>>>>> Download Full
Doothcrow: Post Production Workflow / Offline Editing / Avid Media Composer >>>>> Download LINK
>>>>> Download Now
Doothcrow: Post Production Workflow / Offline Editing / Avid Media Composer >>>>> Download Full
>>>>> Download LINK rV